Tutorial
Git 02: GitHub.com - Repos & Forks
Authors: Megan A. Jones
Last Updated: Apr 8, 2021
In this tutorial, we will fork, or create a copy in your github.com account, an existing GitHub repository. We will also explore the github.com interface.
- Create a GitHub account.
- Know how to navigate to and between GitHub repositories.
- Create your own fork, or copy, a GitHub repository.
- Explain the relationship between your forked repository and the master repository it was created from.
Additional Resources
- Diagram of Git Commands -- this diagram includes more commands than we will learn in this series but includes all that we use for our standard workflow.
- GitHub Help Learning Git resources
Create An Account
If you do not already have a GitHub account, go to GitHub and sign up for your free account. Pick a username that you like! This username is what your colleagues will see as you work with them in GitHub and Git.
Take a minute to setup your account. If you want to make your account more recognizable, be sure to add a profile picture to your account!
If you already have a GitHub account, simply sign in.
Navigate GitHub
Repositories, AKA Repos
Let's first discuss the repository or "repo". (The cool kids say repo, so we will jump on the git cool kid bandwagon) and use "repo" from here on in. According to the GitHub glossary:
A repository is the most basic element of GitHub. They're easiest to imagine as a project's folder. A repository contains all of the project files (including documentation), and stores each file's revision history. Repositories can have multiple collaborators and can be either public or private.
In the Data Institute, we will share our work in the DI-NEON-participants repo.
Find an Existing Repo
The first thing that you'll need to do is find the DI-NEON-participants repo. You can find repos in two ways:
- Type “DI-NEON-participants” in the github.com search bar to find the repository.
- Use the repository URL if you have it - like so: https://github.com/NEONScience/DI-NEON-participants.
Navigation of a Repo Page
Once you have found the Data Institute participants repo, take 5 minutes to explore it.
Git Repo Names
First, get to know the repository naming convention. Repository names all take the format:
OrganizationName/RepositoryName
So the full name of our repository is:
NEONScience/DI-NEON-participants
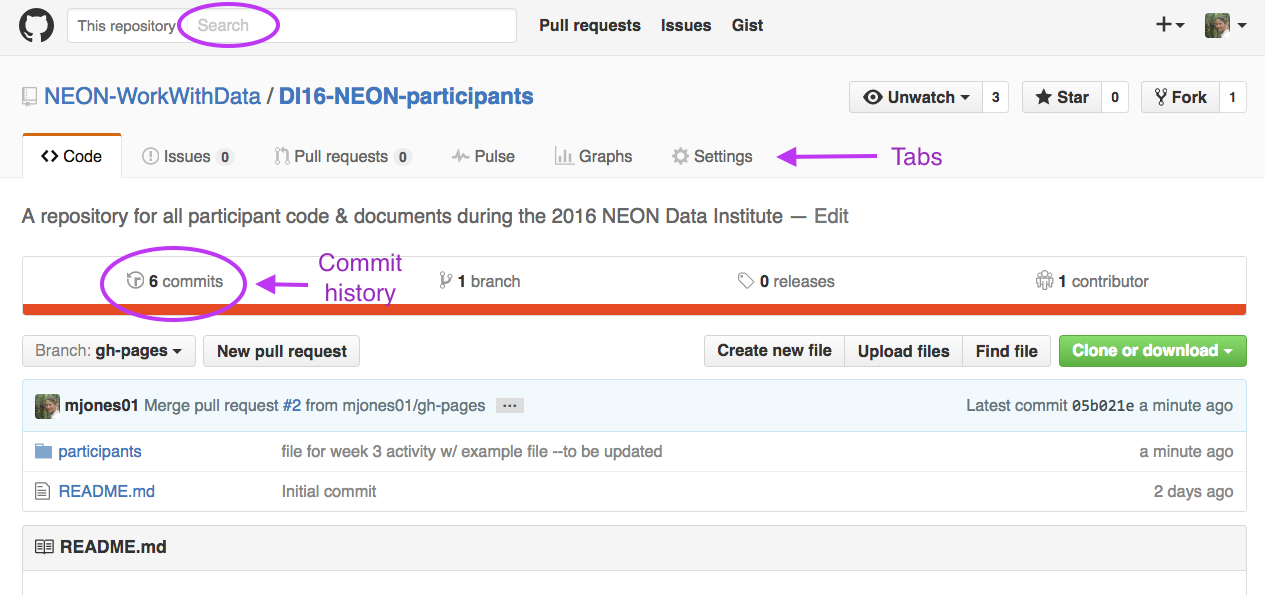
Header Tabs
At the top of the page you'll notice a series of tabs. Please focus on the following 3 for now:
- Code: Click here to view structure & contents of the repo.
- Issues: Submit discussion topics, or problems that you are having with the content in the repo, here.
- Pull Requests: Submit changes to the repo for review / acceptance. We will explore pull requests more in the Git 06 tutorial.

Other Text Links
A bit further down the page, you'll notice a few other links:
- commits: a commit is a saved and documented change to the content or structure of the repo. The commit history contains all changes that have been made to that repo. We will discuss commits more in Git 05: Git Add Changes -- Commits .
Fork a Repository
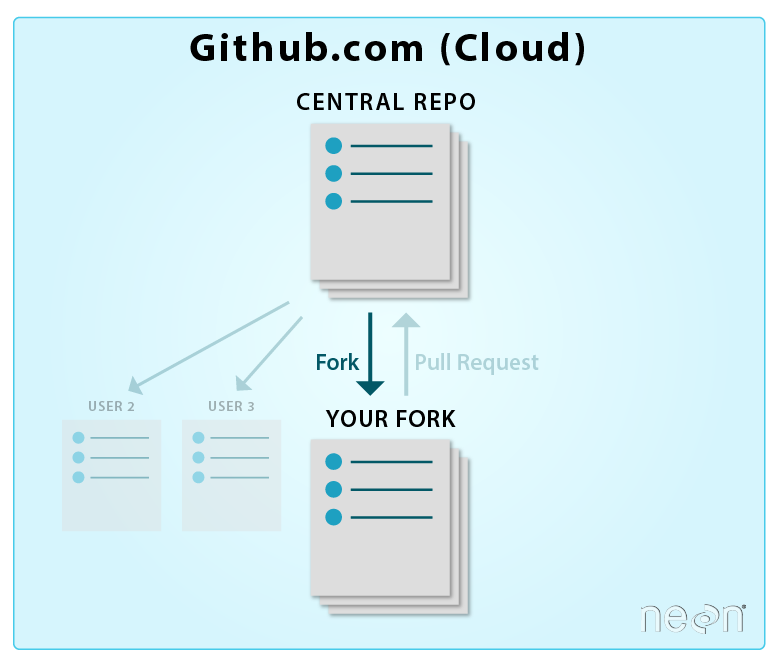
Next, let's discuss the concept of a fork on the github.com site. A fork is a copy of the repo that you create in your account. You can fork any repo at any time by clicking the fork button in the upper right hand corner on github.com.


Create your own fork of the DI-NEON-participants now.
Check Out Your Data Institute Fork
Now, check out your new fork. Its name should be:
YOUR-USER-NAME/DI-NEON-participants.
It can get confusing sometimes moving between a central repo:
and your forked repo:
A good way to figure out which repo you are viewing is to look at the name of the repo. Does it contain your username? Or your colleagues'? Or NEON's?
Your Fork vs the Central Repo
Your fork is an exact copy, or completely in sync with, the NEON central repo. You could confirm this by comparing your fork to the NEON central repository using the pull request option. We will learn about pull requests in Git06: Sync GitHub Repos with Pull Requests. For now, take our word for it.
The fork will remain in sync with the NEON central repo until:
- You begin to make changes to your forked copy of the repo.
- The central repository is changed or updated by a collaborator.
If you make changes to your forked repo, the changes will not be added to the NEON central repo until you sync your fork with the NEON central repo.
Summary Workflow -- Fork a GitHub Repository
On the github.com website:
- Navigate to desired repo that you want to fork.
- Click Fork button.
Have questions? No problem. Leave your question in the comment box below. It's likely some of your colleagues have the same question, too! And also likely someone else knows the answer.