Tutorial
Git 06: Sync GitHub Repos with Pull Requests
Last Updated: Apr 8, 2021
This tutorial covers adding new edits or contents from your forked repo on github.com and a central repo.
- Explain the concept of base fork and head fork.
- Know how to transfer changes (sync) between a fork & a central repo in GitHub.
- Create a Pull Request on the GitHub.com website.
Additional Resources
- Diagram of Git Commands: this diagram includes more commands than we will learn in this series.
- GitHub Help Learning Git resources
We now have done the following:
- We've forked (made an individual copy of) the
NEONScience/DI-NEON-participantsrepo to our github.com account. - We've cloned the forked repo - making a copy of it on our local computers.
- We've added files and content to our local copy of the repo and committed the changes.
- We've pushed those changes back up to our forked repo on github.com.
Once you've forked and cloned a repo, you are all setup to work on your project. You won't need to repeat those steps.
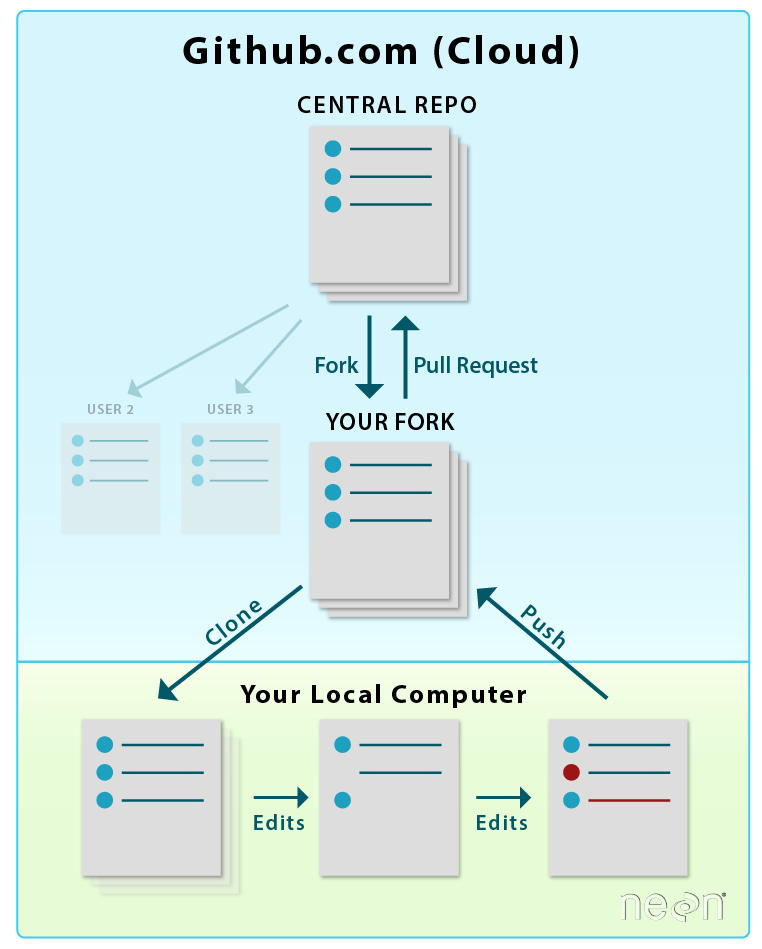

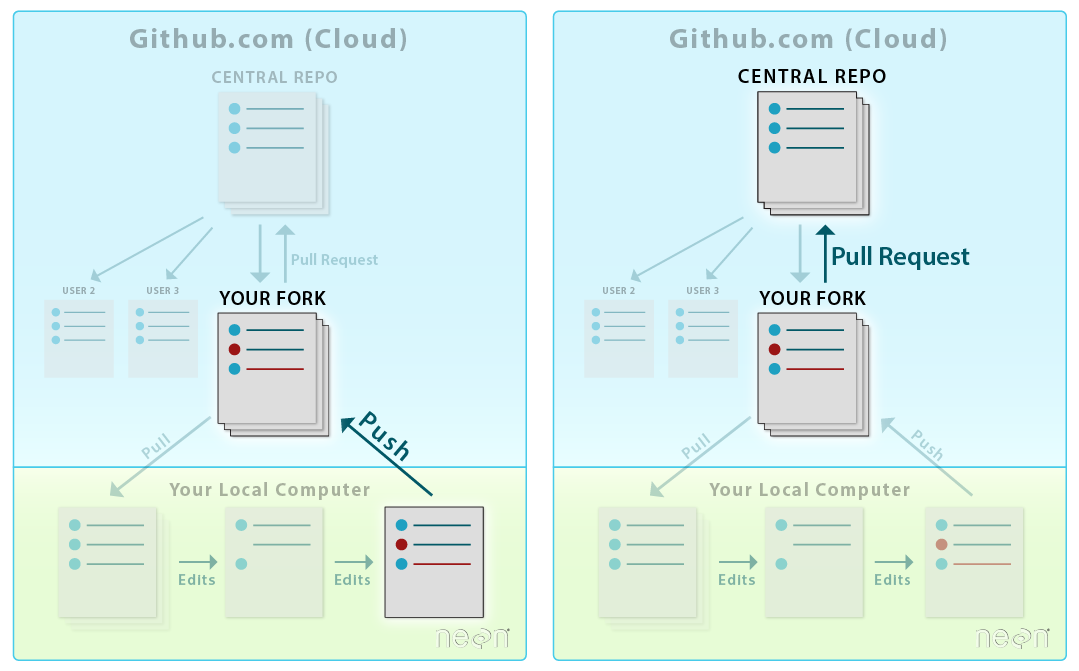
In this tutorial, we will learn how to transfer changes from our forked repo in our github.com account to the central NEON Data Institute repo. Adding information from your forked repo to the central repo in GitHub is done using a pull request.
- It allows you to contribute to another repo without needing administrative privileges to make changes to the repo.
- It allows others to review your changes and suggest corrections, additions, edits, etc.
- It allows repo administrators control over what gets added to their project repo.
The ability to suggest changes to ANY (public) repo, without needing administrative privileges is a powerful feature of GitHub. In our case, you do not have privileges to actually make changes to the DI-NEON-participants repo. However you can make as many changes as you want in your fork, and then suggest that NEON add those changes to their repo, using a pull request. Pretty cool!
Adding to a Repo Using Pull Requests
Pull Requests in GitHub
Step 1 - Start Pull Request
To start a pull request, click the pull request button on the main repo page.
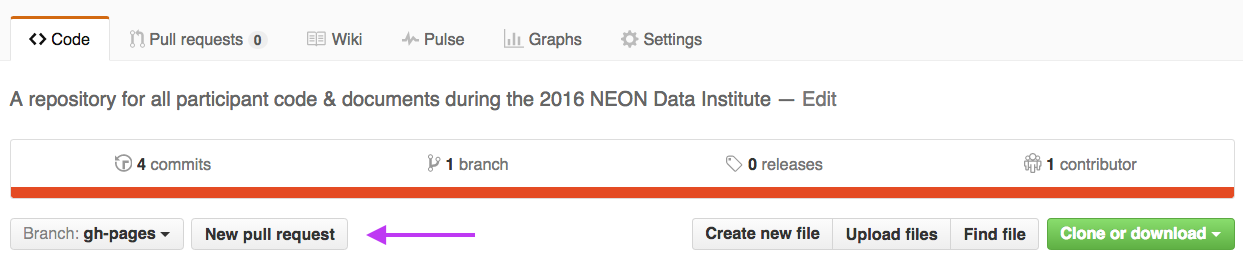
Alternatively, you can click the Pull requests tab, then on this new page click the "New pull request" button.
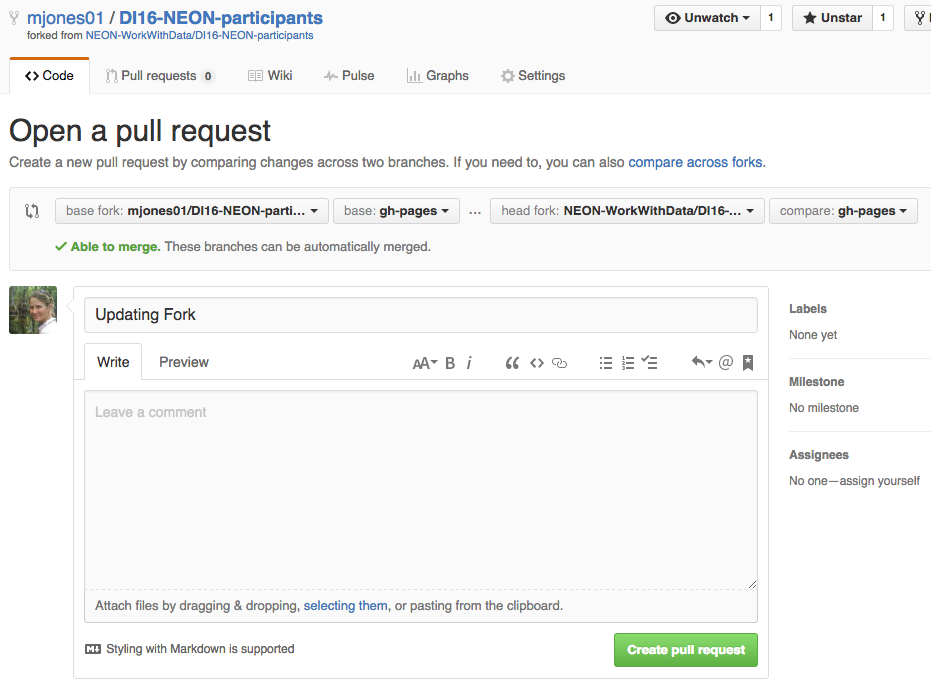
Step 2 - Choose Repos to Update
Select your fork to compare with NEON central repo. When you begin a pull request, the head and base will auto-populate as follows:
- base fork: NEONScience/DI-NEON-participants
- head fork: YOUR-USER-NAME/DI-NEON-participants
The above pull request configuration tells Git to sync (or update) the NEON repo with contents from your repo.
Head vs Base
- Base: the repo that will be updated, the changes will be added to this repo.
- Head: the repo from which the changes come.
One way to remember this is that the “head” is always ahead of the base, so we must add from the head to the base.
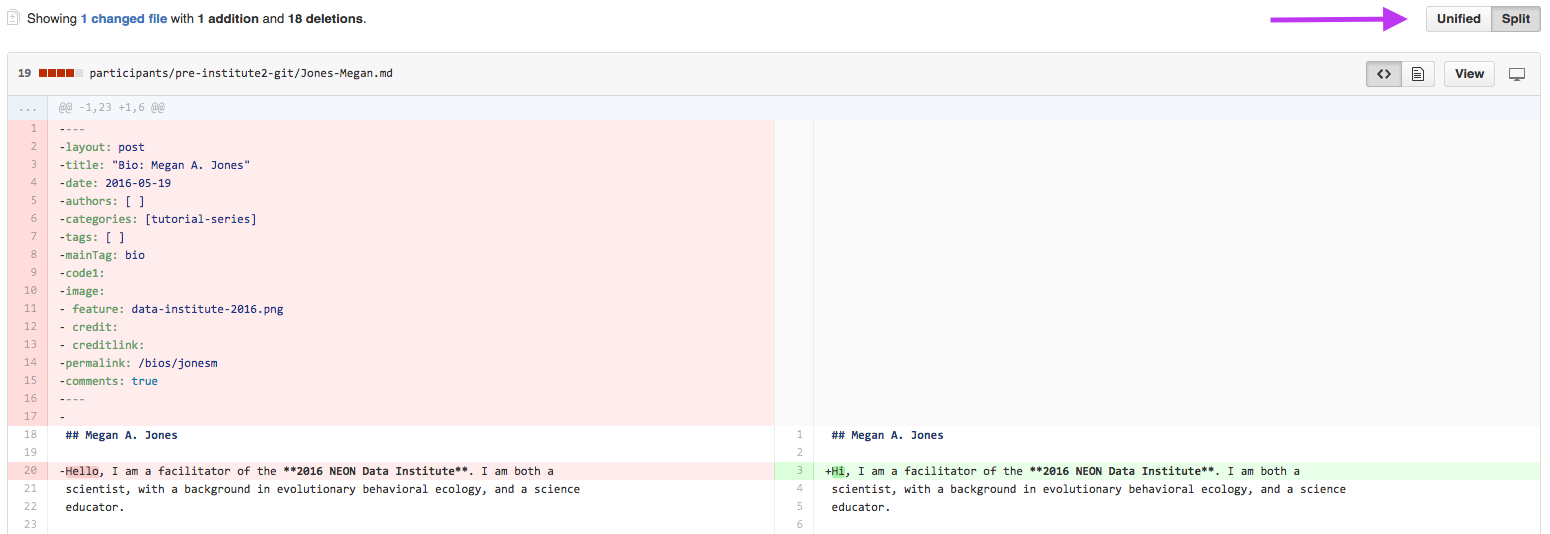
Step 3 - Verify Changes
When you compare two repos in a pull request page, git will provide an overview of the differences (diffs) between the files (if the file is a binary file, like code. Non-binary files will just show up as a fully new file if it had any changes). Look over the changes and make sure nothing looks surprising.
Step 4 - Create Pull Request
Click the green Create Pull Request button to create the pull request.
Step 5 - Title Pull Request
Give your pull request a title and write a brief description of your changes. When you’re done with your message, click Create pull request!
Check out the repo name up at the top (in your repo and in screenshot above) When creating the pull request you will be automatically transferred to the base repo. Since the central repo was the base, github will automatically transfer you to the central repo landing page.
Step 6 - Merge Pull Request
In this final step, it’s time to merge your changes in the NEONScience/DI-NEON-participants repo.
NOTE 1: You are only able to merge a pull request in a repo that you have permissions to!
NOTE 2: When collaborating, it is generally poor form to merge your own Pull Request, better to tag (@username) a collaborator in the comments so they know you want them to look at it. They can then review and, if acceptable, merge it.
To merge, your (or someone else's PR click the green "Merge Pull Request" button to "accept" or merge the updated commits in the central repo into your repo. Then click Confirm Merge.
We now synced our forked repo with the central NEON Repo. The next step in working in a GitHub workflow is to transfer any changes in the central repository into your local repo so you can work with them.
Data Institute Activity: Submit Pull Request for Week 2 Assignment
Submit a pull request containing the .md file that you created in this
tutorial-series series. Before you submit your PR, review the
Week 2 Assignment page.
To ensure you have all of the required elements in your .md file.
To submit your PR:
Repeat the pull request steps above, with the base and head switched. Your base will be the NEON central repo and your HEAD will be YOUR forked repo:
- base fork: NEONScience/DI-NEON-participants
- head fork: YOUR-USER-NAME/DI-NEON-participants
When you get to Step 6 - Merge Pull Request (PR), are you able to merge the PR?
- Finally, go to the NEON Central Repo page in github.com. Look for the Pull Requests link at the top of the page. How many Pull Requests are there?
- Click on the link - do you see your Pull Request?
You can only merge a PR if you have permissions in the base repo that you are adding to. At this point you don’t have contributor permissions to the NEON repo. Instead someone who is a contributor on the repository will need to review and accept the request.
After completing the pull request to upload your bio markdown file, be sure to continue on to Git 07: Updating Your Repo by Setting Up a Remote to learn how to update your local fork and really begin the cycle of working with Git & GitHub in a collaborative manner.
Workflow Summary
Add updates to Central Repo with Pull Request
On github.com
-
Button: Create New Pull Request
-
Set base: central Institute repo, set head: your Fork
-
Make sure changes are what you want to sync
-
Button: Create Pull Request
-
Add Pull Request title & comments
-
Button: Create Pull Request
-
Button: Merge Pull Request - if working collaboratively, poor style to merge your own PR, and you only can if you have contributor permissions
Have questions? No problem. Leave your question in the comment box below. It's likely some of your colleagues have the same question, too! And also likely someone else knows the answer.