Tutorial
Download a NEON Teaching Data Subset & Set A Working Directory In R
Authors: Megan A. Jones, Donal O'Leary
Last Updated: Apr 8, 2021
The primary goal of this tutorial is to explain how to set a working directory in R. The working directory is where your R session interacts with your hard drive. This is where you can read data that you want to use, and save new information such as derived data products, tables, maps, and figures. It is a good practice to store your information in an organized set of directories, so you will often want to change your working directory depending on what kinds of information that you need to access. This tutorial teaches how to download and unzip the data files that accompany many NEON Data Skills tutorials, and also covers the concept of file paths. You can read from top to bottom, or use the menu bar at left to navigate to your desired topic.
Learning Objectives
After completing this tutorial, you will be able to:
- Be able to download and uncompress NEON Teaching Data Subsets.
- Be able to set the R working directory.
- Know the difference between full, base and relative paths.
- Be able to write out both full and relative paths for a given file or directory.
Things You’ll Need To Complete This Lesson
To complete this lesson you will need the most current version of R and, preferably, RStudio loaded on your computer.
Download Data
NEON Teaching Data Subset: Meteorological Data for Harvard Forest
The data used in this lesson were collected at the National Ecological Observatory Network's Harvard Forest field site. These data are proxy data for what will be available for 30 years on the NEON data portal for the Harvard Forest and other field sites located across the United States.
NEON Teaching Data Subset: Site Layout Shapefiles
These vector data provide information on the site characterization and infrastructure at the National Ecological Observatory Network's Harvard Forest field site. The Harvard Forest shapefiles are from the Harvard Forest GIS & Map archives. US Country and State Boundary layers are from the US Census Bureau.
Set Up For NEON Data Skills Tutorials
Many NEON data tutorials utilize teaching data subsets which are hosted on the NEON Data Skills figshare repository. If a data subset is required for a tutorial it can be downloaded at the top of each tutorial in the Download Data section.
Prior to working with any data in R, we must set the working directory to the location of the data files. Setting the working directory tells R where the data files are located on the computer. If the working directory is not correctly set first, when we try to open a file we will get an error telling us that R cannot find the file.
- Wondering why we're saying directory instead of folder? See our discussion of Directory vs. Folder in the middle of this tutorial.
Download & Uncompress the Data
1) Download
First, we will download the data to a location on the computer. To download the data for this tutorial, click the blue button Download NEON Teaching Data Subset: Meteorological Data for Harvard Forest within the box at the top of this page.
Note: In other NEON Data Skills tutorials, download all data subsets in the Download Data section prior to starting the tutorial. Here, the second data subset is for those wishing to practice these skills in a Challenge activity and will be downloaded at that time.
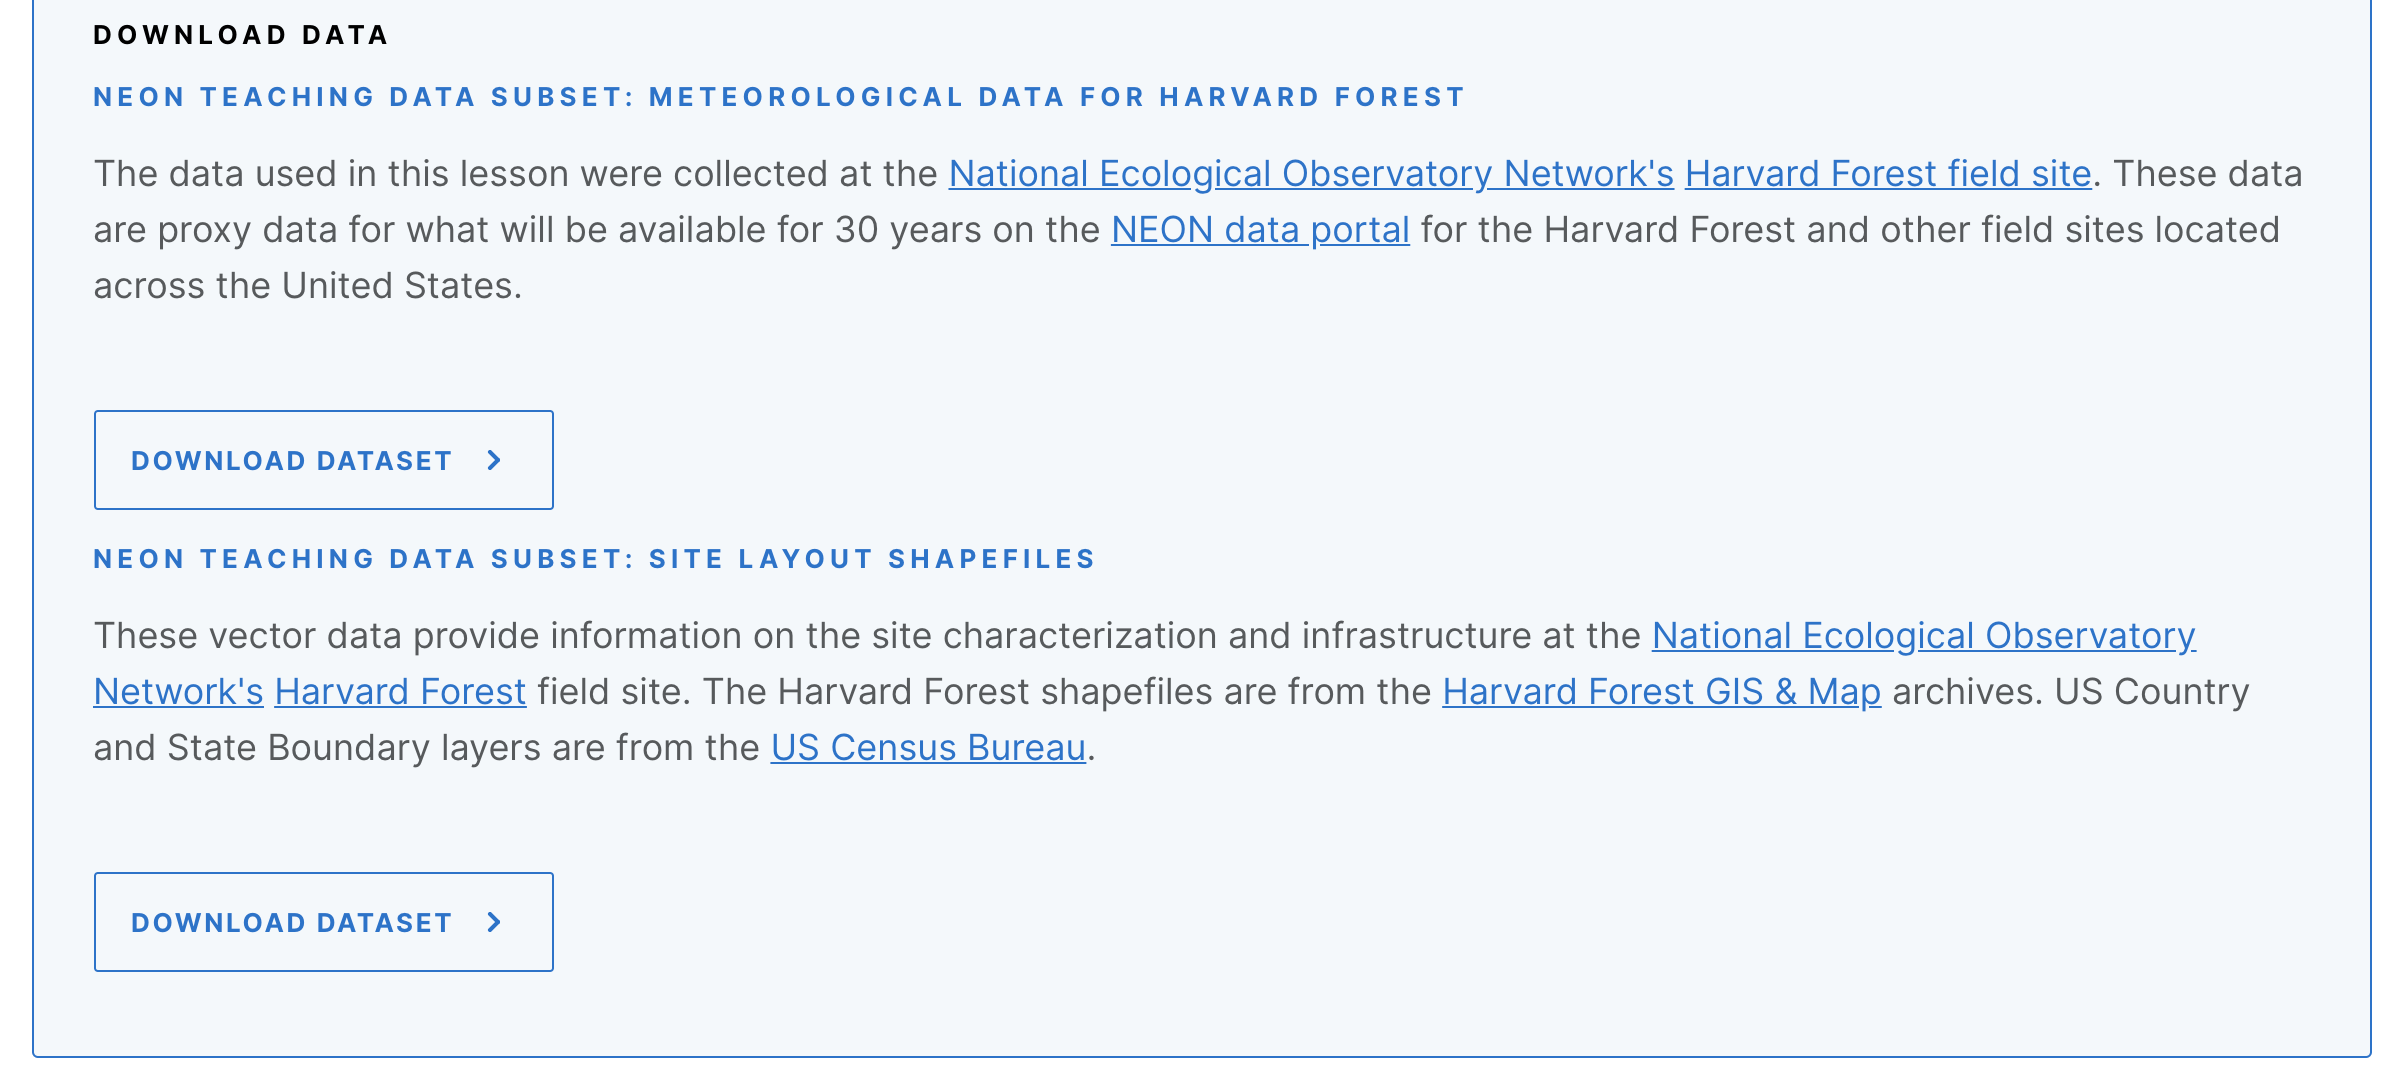
After clicking on the Download Data button, the data will automatically download to the computer.
2) Locate .zip file
Second, we need to find the downloaded .zip file. Many browsers default to downloading to the Downloads directory on your computer. Note: You may have previously specified a specific directory (folder) for files downloaded from the internet, if so, the .zip file will download there.

3) Move to data directory
Third, we must move the data files to the location we want to work with them. We recommend moving the .zip to a dedicated data directory within the Documents directory on your computer. This data directory can then be a repository for all data subsets you use for the NEON Data Skills tutorials. Note: If you chose to store your data in a different directory (e.g., not in ~/Documents/data), modify the directions below with the appropriate file path to your data directory.
4) Unzip/uncompress
Fourth, we need to unzip/uncompress the file so that the data files can be
accessed. Use your favorite tool that can unpackage/open .zip files (e.g.,
winzip, Archive Utility, etc). The files will now be accessible in a directory
named NEON-DS-Met-Time-Series containing all the subdirectories and files that
make up the dataset or the subdirectories and files will be unzipped directly
into the data directory. If the latter happens, they need to be moved into a
data/NEON-DS-Met-Time-Series directory.
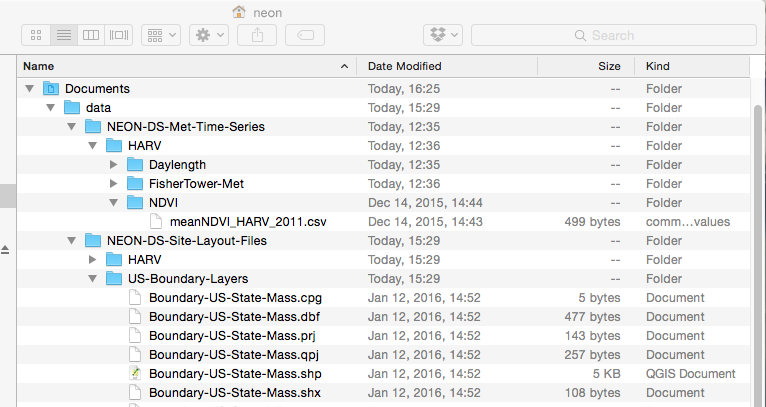
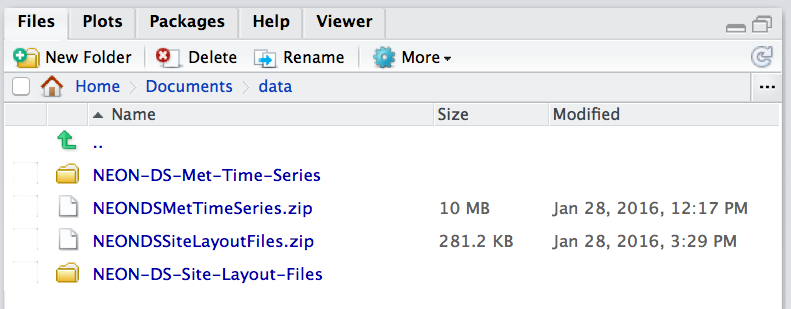
The directory should be the same as in this screenshot (below). Note that
NEON-DS-Site-Lyout-Files directory will only be in your directory if you
completed the challenge above. If you did not, your directory should look the
same but without that directory.
Directory vs. Folder
"Directory" and "Folder" both refer to the same thing. Folder makes a lot of sense when we think of an isolated folder as a "bin" containing many files. However, the analogy to a physical file folder falters when we start thinking about the relationship between different folders and how we tell a computer to find a specific folder. This is why the term directory is often preferred. Any directory (folder) can hold other directories and/or files. When we set the working directory, we are telling the computer the location of the directory (or folder) to start with when looking for other files or directories, or to save any output to.
Full, Base, and Relative Paths
The data downloaded and unzipped in the previous steps are located within a nested set of directories:
- primary-level/home directory: neon
- This directory isn't obvious as we are within this directory once we log into the computer.
- You will see your own user ID.
- secondary-level directory: neon/Documents
- tertiary-level directory: neon/Documents/data
- quaternary-level directory: neon/Documents/data/NEON-DS-Met-Time-Series
- quaternary-level directory: neon/Documents/data/NEON-DS-Site-Layout-Shapefiles
Full & Base Path
The full path is essentially the complete "directions" for how to find the
desired directory or file. It always starts with the home directory or root
(e.g., /Users/neon/). A full path is the base path when used to set
the working directory to a specific directory. The base path for the
NEON-DS-Met-Time-Series directory would be:
/Users/neon/Documents/data/NEON-DS-Met-Time-Series
Tip: When typing in the Rstudio console or an R script, if you surround your filepath with quotes you can take advantage of the 'tab-completion' feature. To use this feature, begin typing your filepath (e.g., "~/" or "C:") and then hit the tab button, which should pop up a list of possible directories and files that you could be pointing to. This method is awesome for avoiding typos in complex or long filepaths!
Bonus Points: Write the path as for one of the other operating systems.
Relative Path
A relative path is a path to a directory or file that starts from the location determined by the working directory. If our working directory is set to the data directory,
/Users/neon/Documents/data/
we can then create a relative path for all directories and files within the data directory.
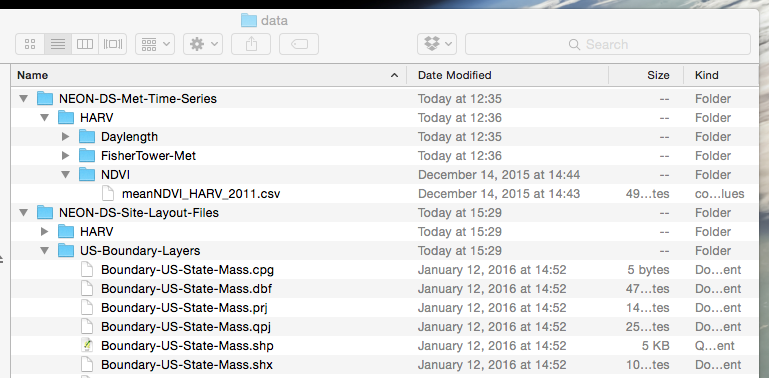
The relative path for the meanNDVI_HARV_2011.csv file would be:
NEON-DS-Met-Time-Series/HARV/NDVI/meanNDVI_HARV_2011.csv
- Write out the full path to for the
Boundary-US-State-Mass.shpfile. - Write out the relative path for the
Boundary-US-State-Mass.shpfile assuming that the working directory is set to/Users/neon/Documents/data/.
Bonus: Write the paths as for one of the other operating systems.
The R Working Directory
In R, the working directory is the directory where R starts when looking for any file to open (as directed by a file path) and where it saves any output.
Without a working directory all R scripts would need the full file path written any time we wanted to open or save a file. It is more efficient if we have a base file path set as our working directory and then all file paths written in our scripts only consist of the file path relative to that base path (a relative path).
- If you are unfamiliar with the term full path, base path, or relative path, please see the section below on Full, Base, and Relative Paths for a more detailed explanation before continuing with this tutorial.
Find a Full Path to a File in Unknown Location
If you are unsure of the path to a specific directory or file, you can find this information for a particular file/directory of interest by looking in the:
- Windows: Properties, General tab (right click on the file/directory) or in the file path bar at the top of each window (select versions).
- Mac OS X: Get Info (right clicking/control+click on the file/directory)
The file path may appear as:
Computer > Users > neon > Documents > data > NEON-DS-Met-Time-Series
Copy and paste this information to automatically reformat into the full path to the directory or file:
- Windows:
C:\Users\neon\Documents\data\NEON-DS-Met-Time-Series - Mac OS X:
/Users/neon/Documents/data/NEON-DS-Met-Time-Series
Determine Current Working Directory
Once we are in the R program, we can view the current working directory
using the code getwd().
# view current working directory
getwd()
[1] "/Users/neon"
The working directory is currently set to the home directory /Users/neon.
Remember, your current working directory will have a different user name and may
appear different based on operating system.
This code can be used at any time to determine the current working directory.
Set the Working Directory
To set our current working directory to the location where our data are located, we can either set the working directory in the R script or use our current GUI to select the working directory.
We want to set our working directory to the data directory.
Set the Working Directory: Base Path in Script
We can set the working directory using the code setwd("PATH") where PATH is
the full path to the desired directory. You can enter "PATH" as a string (as
shown below), or save the file path as a string to a variable (e.g.,
wd <- "~/Documents/data") and then set the working directory based on
that variable (e.g., setwd(wd)).
This latter method is used in many of the NEON Data Skills tutorials because of the advantages that this method provides. First, this method is extermely flexible across different compute environments and formats, including personal computers, Linux-based servers on 'the cloud' (e.g., AWS, CyVerse), and when using Rmarkdown (.Rmd) documents. Second this method allows the tutorial's user to set their working directory once as a string and then to reuse that string as needed to reference input files, or make output files. For example, some functions must have a full filepath to an input file (such as when reading in HDF5 files). Third, this method simplifies the process that NEON uses internally to create and update these tutorials. All in all, saving the working directory as a string variable makes the code more explicit and determanistic without relying on working knowledge of relative filepaths, making your code more producible and easier for an outsider to interpret.
To practice, use these techniques to set your working directory to the directory where
you have the data saved, and check that you set the working directory correctly.
There is no R output from setwd(). If we want to check
that the working directory is correctly set we can use getwd().
Example Windows File Path
Notice the the backslashes used in Windows paths must be changed to slashes in R.
# set the working directory to `data` folder
wd <- "C:/Users/neon/Documents/data"
setwd(wd)

# check to ensure path is correct
getwd()
[1] "C:/Users/neon/Documents/data"
Example Mac OS X File Path
# set the working directory to `data` folder
wd <- "/Users/neon/Documents/data"
setwd(wd)

# check to ensure path is correct
getwd()
[1] "/Users/neon/Documents/data"
Set the Working Directory: Using RStudio GUI
You can also set the working directory using the Rstudio and/or R graphical user interface (GUI).
This method is easy for beginners to learn, but it also makes your code less
reproducible because it relies on a person to follow certain instructions, which
is a process that introduces human error. It may also be impossible for an observer
to determine where your input data are stored, which can make troubleshooting
more difficult as well. Use this method when getting started, or when you will
find it helpful to use a graphical user interface to navigate your files.
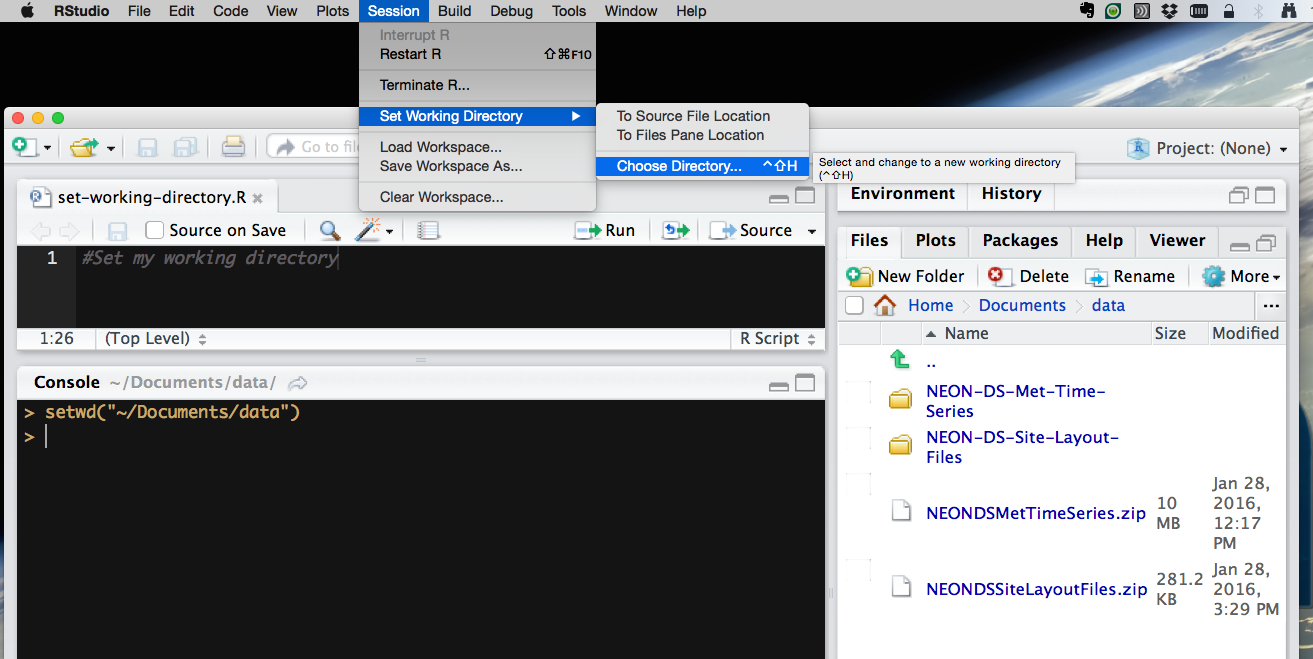
Note that this method will run a single line setwd() command in the console
when you select your working directory, so you can copy/paste that line into
your script for future use!
- Go to
Sessionin menu bar, - select
Select Working Directory, - select
Choose Directory, - in the new window that appears, select the appropriate directory.
Set the Working Directory: Using R GUI
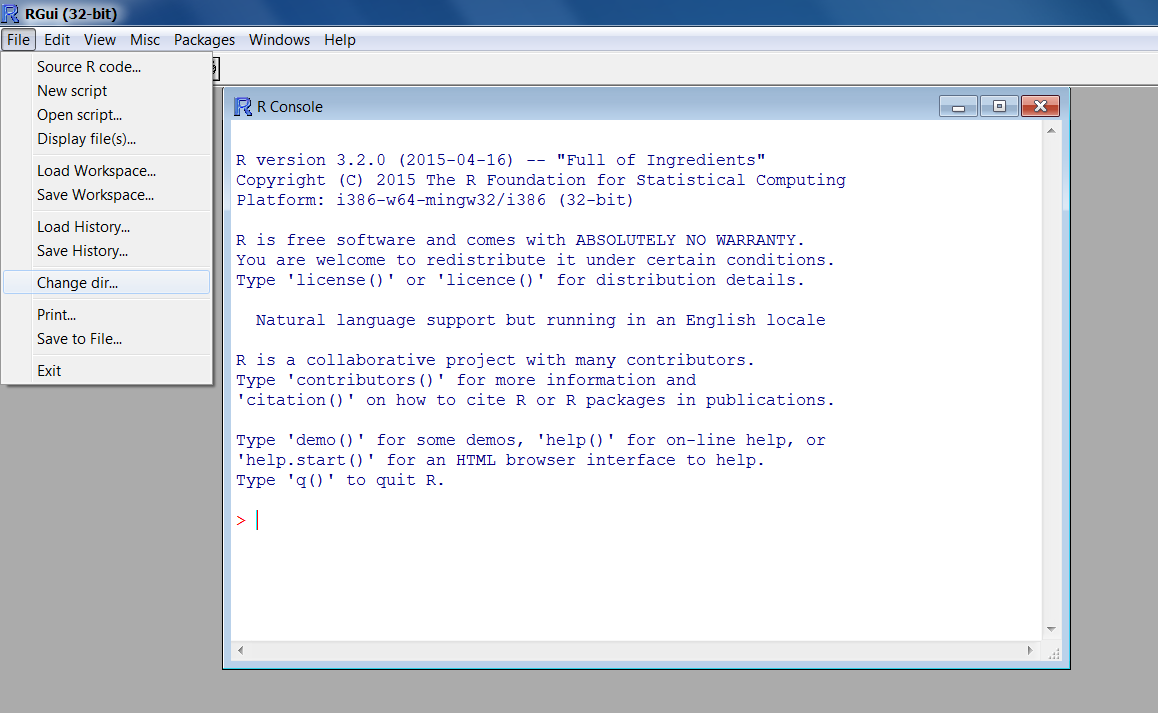
Windows Operating Systems:
- Go to the
Filemenu bar, - select
Change dir...orChange Working Directory, - in the new window that appears, select the appropriate directory.
Mac Operating Systems:
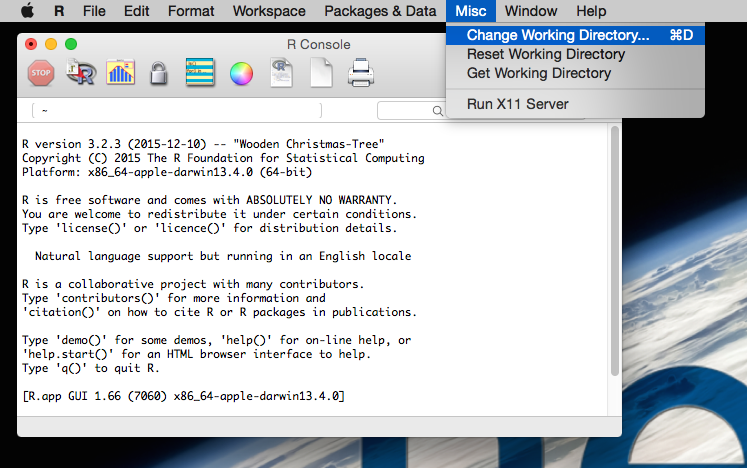
- Go to the
Miscmenu, - select
Change Working Directory, - in the new window that appears, select the appropriate directory.
